Tuesday, March 18, 2014


March with Mazola® Corn Oil
This month's assignment has provoked quite a bit of controversy among the Allrecipes Allstars.  Specifically, the fact that Mazola(R) Corn Oil is made with GMO's (Genetically Modified Organisms).  Does that concern me?  Nope!  Here's why....
I've done some research regarding GMO's on my own.  Frankly, I never even heard of the term until I started reading about it on the Allrecipes Buzz.  As of now, the FDA doesn't require food production companies to label products that contain GMO's.  In order to avoid them, organic is the way to go.  Even then, reports have indicated that there is still a high possibility of cross-contamination in corn crops.  Unless you purchase organic meats, GMO's are present in those products as well because most livestock are fed corn.  I'm betting 90% of the food in my pantry and freezer contain GMO's.
I've been using mostly Canola oil in my cooking for the last several years because of the heart-healthy benefits compared to some other oils.  I do have high blood pressure and high cholesterol, so I try to be at least a little health-conscious in how I prepare food.  Well, guess what?  Canola oil contains GMO's, too, as I've recently discovered.  I've also recently discovered Mazola(R) Corn oil is cholesterol-free and contains no trans-fats.  See the comparison to olive oil here.  I just can't help myself.....I LOVE fried food.  It's one of my guilty pleasures, but does concern me as far as my health restrictions.
If I can indulge my food pleasures with a product that won't hurt my heart or impede my cholesterol-lowering medication, I'm there.  Many people are passionate about the fact that GMO's can be detrimental to health.  I'm just not one of them.  I try to prepare meals that my husband and I enjoy and are well-balanced.  So, that being said, Mazola(R) has asked us to prepare two of their recipes published on the Allrecipes site.  Fortunately, Mazola(R) is flexible as far as diet restrictions are concerned.  One of their recipes, Sweet and Spicy Salmon with Grapefruit Salsa is a no-go for me.  I don't eat seafood, no way, no how, and can't have grapefruit because of my cholesterol medication.  So, I substituted one of their chicken dishes for that recipe.  The other recipe I did make, but with a few modifications.  Mazola(R) has ten recipes published on Allrecipes.  You can find them here.
So, these are the recipes and the verdict on my March assignments!!

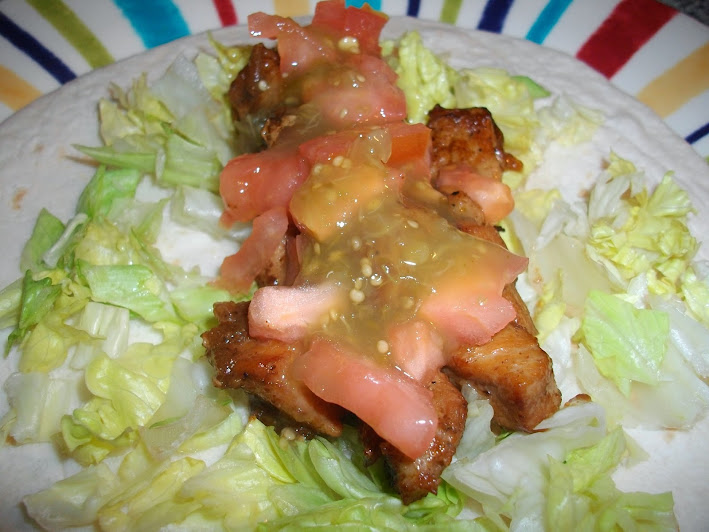
First up is their Pork Carnitas recipe.  It was delicious.  The pork was so tender, not dry and nicely spiced.  I was forced to make a couple of changes, though.  I couldn't find fresh tomatillos at my grocer, so I purchased salsa verde and used that instead.  Second, we can't tolerate cilantro, so I omitted that.  Third, we like flour tortillas over corn, so used them instead.  I'll make this one again, but next time may add just a little more spicy heat to the meat.


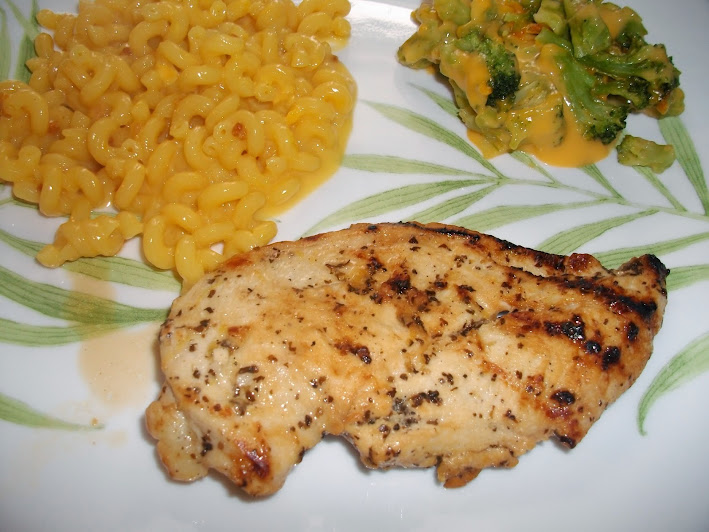
Next up is a chicken dish that was really tasty, especially if you love lemon.  So easy I had dinner served in 30 minutes (after the marinating time, that is).  I used thin-sliced chicken breasts, so no pounding was necessary.  Also, I marinated for about 3 hours in a plastic bag.  I used my stove-top grill pan since our outside grill was covered with 8 inches of snow!  We both enjoyed this one.


#AllstarsMazola®


So that's the deal for March.  A successful one for my family!!  See you in April with Johnsonville sausages.

Judy

Disclaimer:  Mazola® sent me a bottle of their cholesterol-free corn oil for these dishes.  I was not compensated in any other way.  The opinions expressed here are solely mine.


Sunday, February 9, 2014


“Cooking” in My Living Room
Since the Allrecipes Allstar program has been going through a bit of a transition during the last two months, we had no assignments to complete.  Bummer.  So, as a result, I decided to do a little "cooking" in my living room. 

My coffee table and end tables are 10 years old, and were really showing their age.  And how.  They're great tables, though...solid oak and heavy.  The top of the coffee table had years of wear from foot-propping and just generally sliding things around.  When we purchased them, I thought it was a really good idea that they had a factory-distressed top.  Ha!  After hundreds of polishings and cleanings, those distress marks were filling in with dust and "stuff".  Short of taking a toothpick to clean out all those areas, I was at a loss.  Until I discovered brown paper table tops.  Yup.  Honestly.  Brown paper.

I made my trusty shopping list and off to Lowe's I went.  $30 and 30 minutes later I had my supplies.  Here they are......

 
A roll of brown paper found in the paint department
A small bucket to mix the paste
Two bottles of Elmer's All-Purpose glue
Plastic drop cloths
Throw-away brushes (NOT foam) in 2" and 1-1/2" sizes
Painter's tape (which I ended up not using)
MinWax OIL-BASED wood stain (I used Golden Pecan)
MinWax WATER-BASED Polycrylic (I used Semi-Gloss)
 
Now, here's a true picture of what this nasty table looked like up close and personal:


It was either trash it or fix it, so here goes.  I started by mixing a bottle of glue with 3 bottles of water.  If you decide to purchase a gallon-size bottle of glue, just mix what you need at a 3:1 ratio....3 parts water to one part glue.
 
Start ripping the brown paper into the size pieces you want.  There's really no right or wrong in this step.  I used mainly 12" x 12" irregular shaped pieces.  If you have any straight edges to cover, use the edges of the paper for those areas.  I know many tutorials instruct to crumple up the paper and spread glue on it.  Well, I ignored that.  It was much easier for me to dunk the pieces in the glue mixture and squeeze it out with my hands.  (Take off any rings first!)
 
I started on the edges, wrapping the glue-covered paper around the edge of the table and adhering it underneath, then extending it over the top.  First I did all four edges and then filled in the center. Use one of the brushes to smooth out any bubbles or wrinkles.  My 4' x 2' table took about 45 minutes to cover.  Here's what it looked like after all the pieces were in place:
 
 
You can see the glue mixture is still very wet and white, but it does dry clear.  The hardest part is waiting 24 hours until it's completely dry to proceed to the next step.  Also, you can notice some bubbly wrinkles in the paper.  That worried me a little, but I left it alone, and when it was dry they were gone and the paper was stuck tight to the table.
 
The next day I used the oil-based stain on the paper.  Very, very easy and took me about 15 minutes.  Seriously.  I brushed it on in an even, light coat and smoothed it out with the brush.  Here's the table after the stain was applied:
 
 
You can see that the stain is darker where the paper was wrinkled as it was squeezed out during the glue phase.  I love the darker "veins" it makes.  Now wait another 24 hours for it to dry completely.  Once it's dry, it may still look a little "oily", but if you can touch it and it's not tacky, you're good to go to the next step.
 
I applied SIX very thin coats of the Polycrylic.  Make certain each coat is thinly applied, and allow it to dry thoroughly between coats.  The instructions on the can says two hours between coats, but since I did this in winter, the heat was on, the humidity in the house was very low, and I had the ceiling fan on, each coat was dry for me in about an hour.  I did apply one coat of the Polycrylic to the legs of the table to brighten them up and give a little shine.
 
So.....the finished product:


I couldn't be happier with the results.  I have three new tables for $30 and three days of my time!  Now I'm hooked.  Mmmmmaybe the next project will be the wall beneath my kitchen island.
 
So if you have a table that's seen better days, don't hesitate to try this rejuvenating project.  Or if you see a beat-up table at a flea market.....buy it and try this project.  Betcha you'll get hooked just like I did!!
 
Happy living room cooking!!!


Judy